![]() I was exploring ways to make a future robot project more appealing and came across a number of articles about animated robotic eyes created to convey expression or mood. This looked like a bit of fun and quite achievable using the LED matrix modules that I have been playing with for a while. Here’s the result.
I was exploring ways to make a future robot project more appealing and came across a number of articles about animated robotic eyes created to convey expression or mood. This looked like a bit of fun and quite achievable using the LED matrix modules that I have been playing with for a while. Here’s the result.
Hardware
This project works well with all the standard LED matrix modules supported by the MD_MAX72xx library, so no special hardware is needed to run the software.
However, I decided to build a dedicated 2-module unit for the displays, as I am planning to integrate this into a mobile robot in future. The design is based on the Parola modules I designed some time ago, but this time using a surface mount version of the MAX7219 IC to make the PCB smaller. Using Eagle CAD it was a simple process to copy and duplicate the existing design to create the required circuit, shown below.
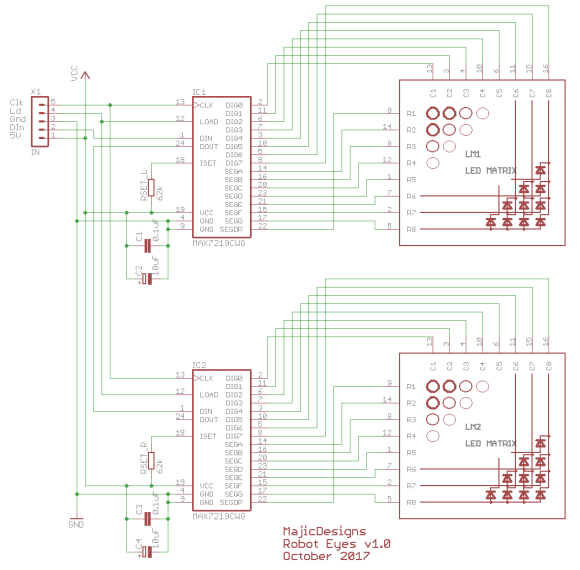
 The PCB footprint was designed to be the same size as the 2 LED matrix modules (at right, click to enlarge) and was manufactured at SeeedStudio’s Fusion PCB service. It took about 2 weeks from design through receiving the 10 neatly packed PCB prototypes in the mail.
The PCB was quickly populated and worked first time, as expected for this repeat design. The only issue was that the distance between the two sides of the LED matrix pins was too close and the outside pins need to be angled into the socket. Not a big deal and it does ensure that the matrices butt tightly against each other in the middle. An updated version of the Eagle CAD schematic and PCB layout files for this project can be downloaded here.
The images below show the PCB front and back, and the populated PCB with one matrix removed to show the components underneath.


Software
An animation is a basic sequence of images that, when played one after the other as ‘frames’, convey a sense of movement. In this instance the target is to animate the images for two eyes so as to convey mood.
To simplify the software, the eye animations start from a neutral expression (ie, eyes open looking forward) and progress through a series of intermediate frames to the main frame that conveys the desired ‘look’. After some time, the sequence can then be reversed back to the neutral expression. In this way, only half of the sequence needs to be defined, as the second half is just the same sequence in reverse.
It is also worth noting that some expressions are identical for both eyes (eg, a blink), others are completely independent of each other (eg, a wink) and still others have a reflected symmetry around where the nose would be (ie, they have a left and a right side). This means that the eyes will need to be independently animated, possibly unsynchronized.
Also, to make the neutral expression more life-like, the software should occasionally just blink the eyes rather than keep a spooky fixed stare.
Using the MD_MAX72xx library, each eye is just an 8×8 bitmap that can be defined using the font editor, described in this previous blog article. A simple sequence for a blink, starting from the eye wide open, is shown left to right in the figure below. The eye opening again is the reverse of this sequence.

This architecture allows the software to define animations sequences as tables of pairs of bitmaps and display duration. The tables are all managed using straightforward code leveraging the font handling features of the MD_MAX72xx library. In fact, all the data for the application can be set up in tables, making it easy to adapt and change the available expressions.
All this is implemented in a class that hides most of the detail from the calling program. As a bonus the class also allows text messages to be scrolled in the LED matrices.
This implementation is available as an example of the MD_MAX72xx library. The video below shows the example program running.
All-in-all a fun project that was easier than I expected, mostly due to being able to leverage existing infrastructure provided by the MD_MAX72xx library.

21 replies on “Robot Eye Expressions using LED Matrix Display”
how can I reverse the txt because its mirror image ?
LikeLike
Your module hardware type is probably specified incorrectly. Please look at the MD_MAX72xx documentation to see how this is changed (at the top of the sketch).
LikeLike
hi, is there any problem in mounting the 2 matrixes rotated upside down? I don’t know which is the correct orientation, i’m afraid to burning them…
also, i’ve no 62k resistors, i used 68k, are they fine, too?
thanks
p.s.: using your pcb you sent me a while ago
LikeLike
Upside down they won’t work but should not be damaged. On my matrices there is a small square tab in the edge that should line up with markings on the pcb. Higher resistor is fine.
LikeLike
it seems all fine hw side, connecting to a wemos d1 r2 using the pinouts in the md_max72xx esp8266 example file (used 5v as on 3v3 only 1 display had turned on)
but on sw side i get an error on line 74 of the roboteyes example:
invalid conversion from ‘const char*’ to ‘char*’ [-fpermissive]
using sdk 2.3.0 and latest library as of today
LikeLike
nope, can’t get it to work… if i put modules in a way, all leds lit up full brightness…
if i rotate both 180°, only some leds seem to lit up, so i flashed the pacman sketch, or the test one, without success in both cases…
this is my setup (tried both hw interface and arbitrary pins), tried on a wemos d1 r2 and on an standard nodemcu, and rotated the displays, too, on every test:
#define HARDWARE_TYPE MD_MAX72XX::PAROLA_HW
#define MAX_DEVICES 2
#define CLK_PIN D5 // or SCK
#define DATA_PIN D7 // or MOSI
#define CS_PIN D8 // or SS
//MD_MAX72XX mx = MD_MAX72XX(HARDWARE_TYPE, CS_PIN, MAX_DEVICES); // SPI hardware interface
MD_MAX72XX mx = MD_MAX72XX(HARDWARE_TYPE, DATA_PIN, CLK_PIN, CS_PIN, MAX_DEVICES); // Arbitrary pins
LikeLike
Are the led modules the right type. There are 2 types with different numbers which differ in the way the common is connected to cathode or anode. Not near my dev machine so can’t tell which is right one for this module but it should be in the original Parola blog post.
LikeLike
hi, i bought the ones you suggested in other comments down here, mine are marked 1088AS, as yours… i had to bend the external legs a bit because your pcb is a little too small (that’s why i asked in other comments if a smaller display was needed)…
LikeLike
Hi, can you share a link to the suitable matrix displays? All the ones i could find seem bigger, the like ones you use in your usual parola displays, or preassempled in modules… thanks
LikeLike
That’s because they are the same matrix displays used with the Parola library, etc. Not sure where you get the idea these are smaller.
For the ‘eyes’ I did create a 2 matrix display PCB, but using 2 standard 1 matrix displays you get the same result.
LikeLike
i’ll unplug 2 displays from a module and try to fit them on the board you kindly sent me a while ago, i forgot about that until now and i eventually remembered wrongly they’re smaller, like the little matrices of the wemos modules (those ARE smaller), like these ones 🙂
https://it.aliexpress.com/item/WAVGAT-Matrix-LED-Scudo-V1-0-0-Per-WEMOS-D1-Mini-Modulo-di-Controllo-di-Uscita/32920188464.html
https://it.aliexpress.com/item/3mm-8×8-Led-Reticolo-Luminoso-Rosso-Modulo-A-Matrice-di-punti-8×8-8-8/32931278476.html
so, is this one correct? https://it.aliexpress.com/item/3mm-8-x-8-Led-Lattice-Bright-Red-Dot-Matrix-Module-8×8-8-8/32823415893.html
thanks
LikeLike
That’s the right size but mine are marked with 1088 not 1588. The difference is in row vs column anode and they are not interchangeable.
LikeLike
thanks, so these ones seem right, they’re advertised as 1088 in description, common cathod
https://it.aliexpress.com/item/2pcs-8-8-Red-Positive-LED-Dot-Matrix-Display-for-Arduino/32426680871.html
LikeLike
hi, i received my 1088 modules, as you said, i had to bend the external pins a bit to fit them in your pcb, look at image: https://imgur.com/a/ji1qPbi
now i need a couple of smd max7219…
LikeLike
are these max7219 fine? Can’t find the ones with your exact version, 1338, only 1420 or other numbers…
https://it.aliexpress.com/item/10-pz-lotto-MAX7219-MAX7219CWG-MAX7219EWG-SOP24-SMD-Display-originale-autentico-In-Magazzino/32969155502.html
LikeLike
Should be ok. The numbers are manufacturing batch numbers so likely to be different..
LikeLike
Okay, it’ll be a good time for a beginner to delve deeper! Very grateful for the tip !!
LikeLike
Hello!
I am a beginner in the Arduino world and I was enthusiastic about your projects directed to the LED displays, they are the best I have ever seen! I am so grateful for the fantastic ideas you share.
Please if possible could you advise me on the following:
I would like to implement a PIR sensor in the “MD_MAX72xx_Eyes” sketch (MD_MAX72xx library example). Where the displays with the animated eyes would be erased and only lit with motion detection. I want to make a toy for my son, could you show me a starting point to implement this?
In advance, very grateful!
(Sorry for the translation “Portuguese-English” via google!)
LikeLike
One way to do this is to edit the idle animation to be just a blank display (ie, effectively all LEDs off). When you get the PIR sensor, you start one of the other animations with the eyes.
LikeLike
I really like this! Where can I get the code? That is just like what I would want the eyes to look like if I made a robot.
LikeLike
As per the article, the code is one of the examples for the MD_MAX72xx library. See the link in the article.
LikeLike